Would like to do a longer post on what I have learned about IP telephony, but in the meantime just fixed a problem setting a new phone (Polycom SP335) up at the office and have to say I continue to be impressed by our phone system provider, OnSIP. Never have to wait long to speak to a real person, no ridiculous prompts to navigate, and very capable and patient technical support. I was having a problem getting this phone registered with our provider, they were able to look at what was going on remotely, identified the router as the likely culprit, and steered me to a setting that needed to be changed, in WAN Setup, NAT Filtering, I had to check the Disable SIP ALG and the radio button for Open (instead of Secured). I might have figured that out eventually, but thanks to OnSIP I didn’t have to!
Monthly Archives: May 2013
Audi B7 Bi-Xenon HID Bulb Replacement
I have been getting intermittent right dipped beam fault errors for the last year or two or three on what is now an almost seven year old Audi S4. The frequency of these errors has gone up in the last month or two, and I also got at least one of them for the left dipped beam. I was following my wife one night recently and she told me one of my headlights was out — I hadn’t realized this error meant the bulb wasn’t on at all, I thought it was related to the adaptive control/leveling mechanism. But the error message is a little confusing, by “dipped” I think they just mean the low beam bulb, and the error symbol is on fact a bulb with an error symbol overlaid on it.
So poked around a bit and decided to replace the HID bulbs, best done in pairs, and most likely the source of the problem. Could also have been the ballasts, but that seemed less likely so worth doing the simpler thing first.
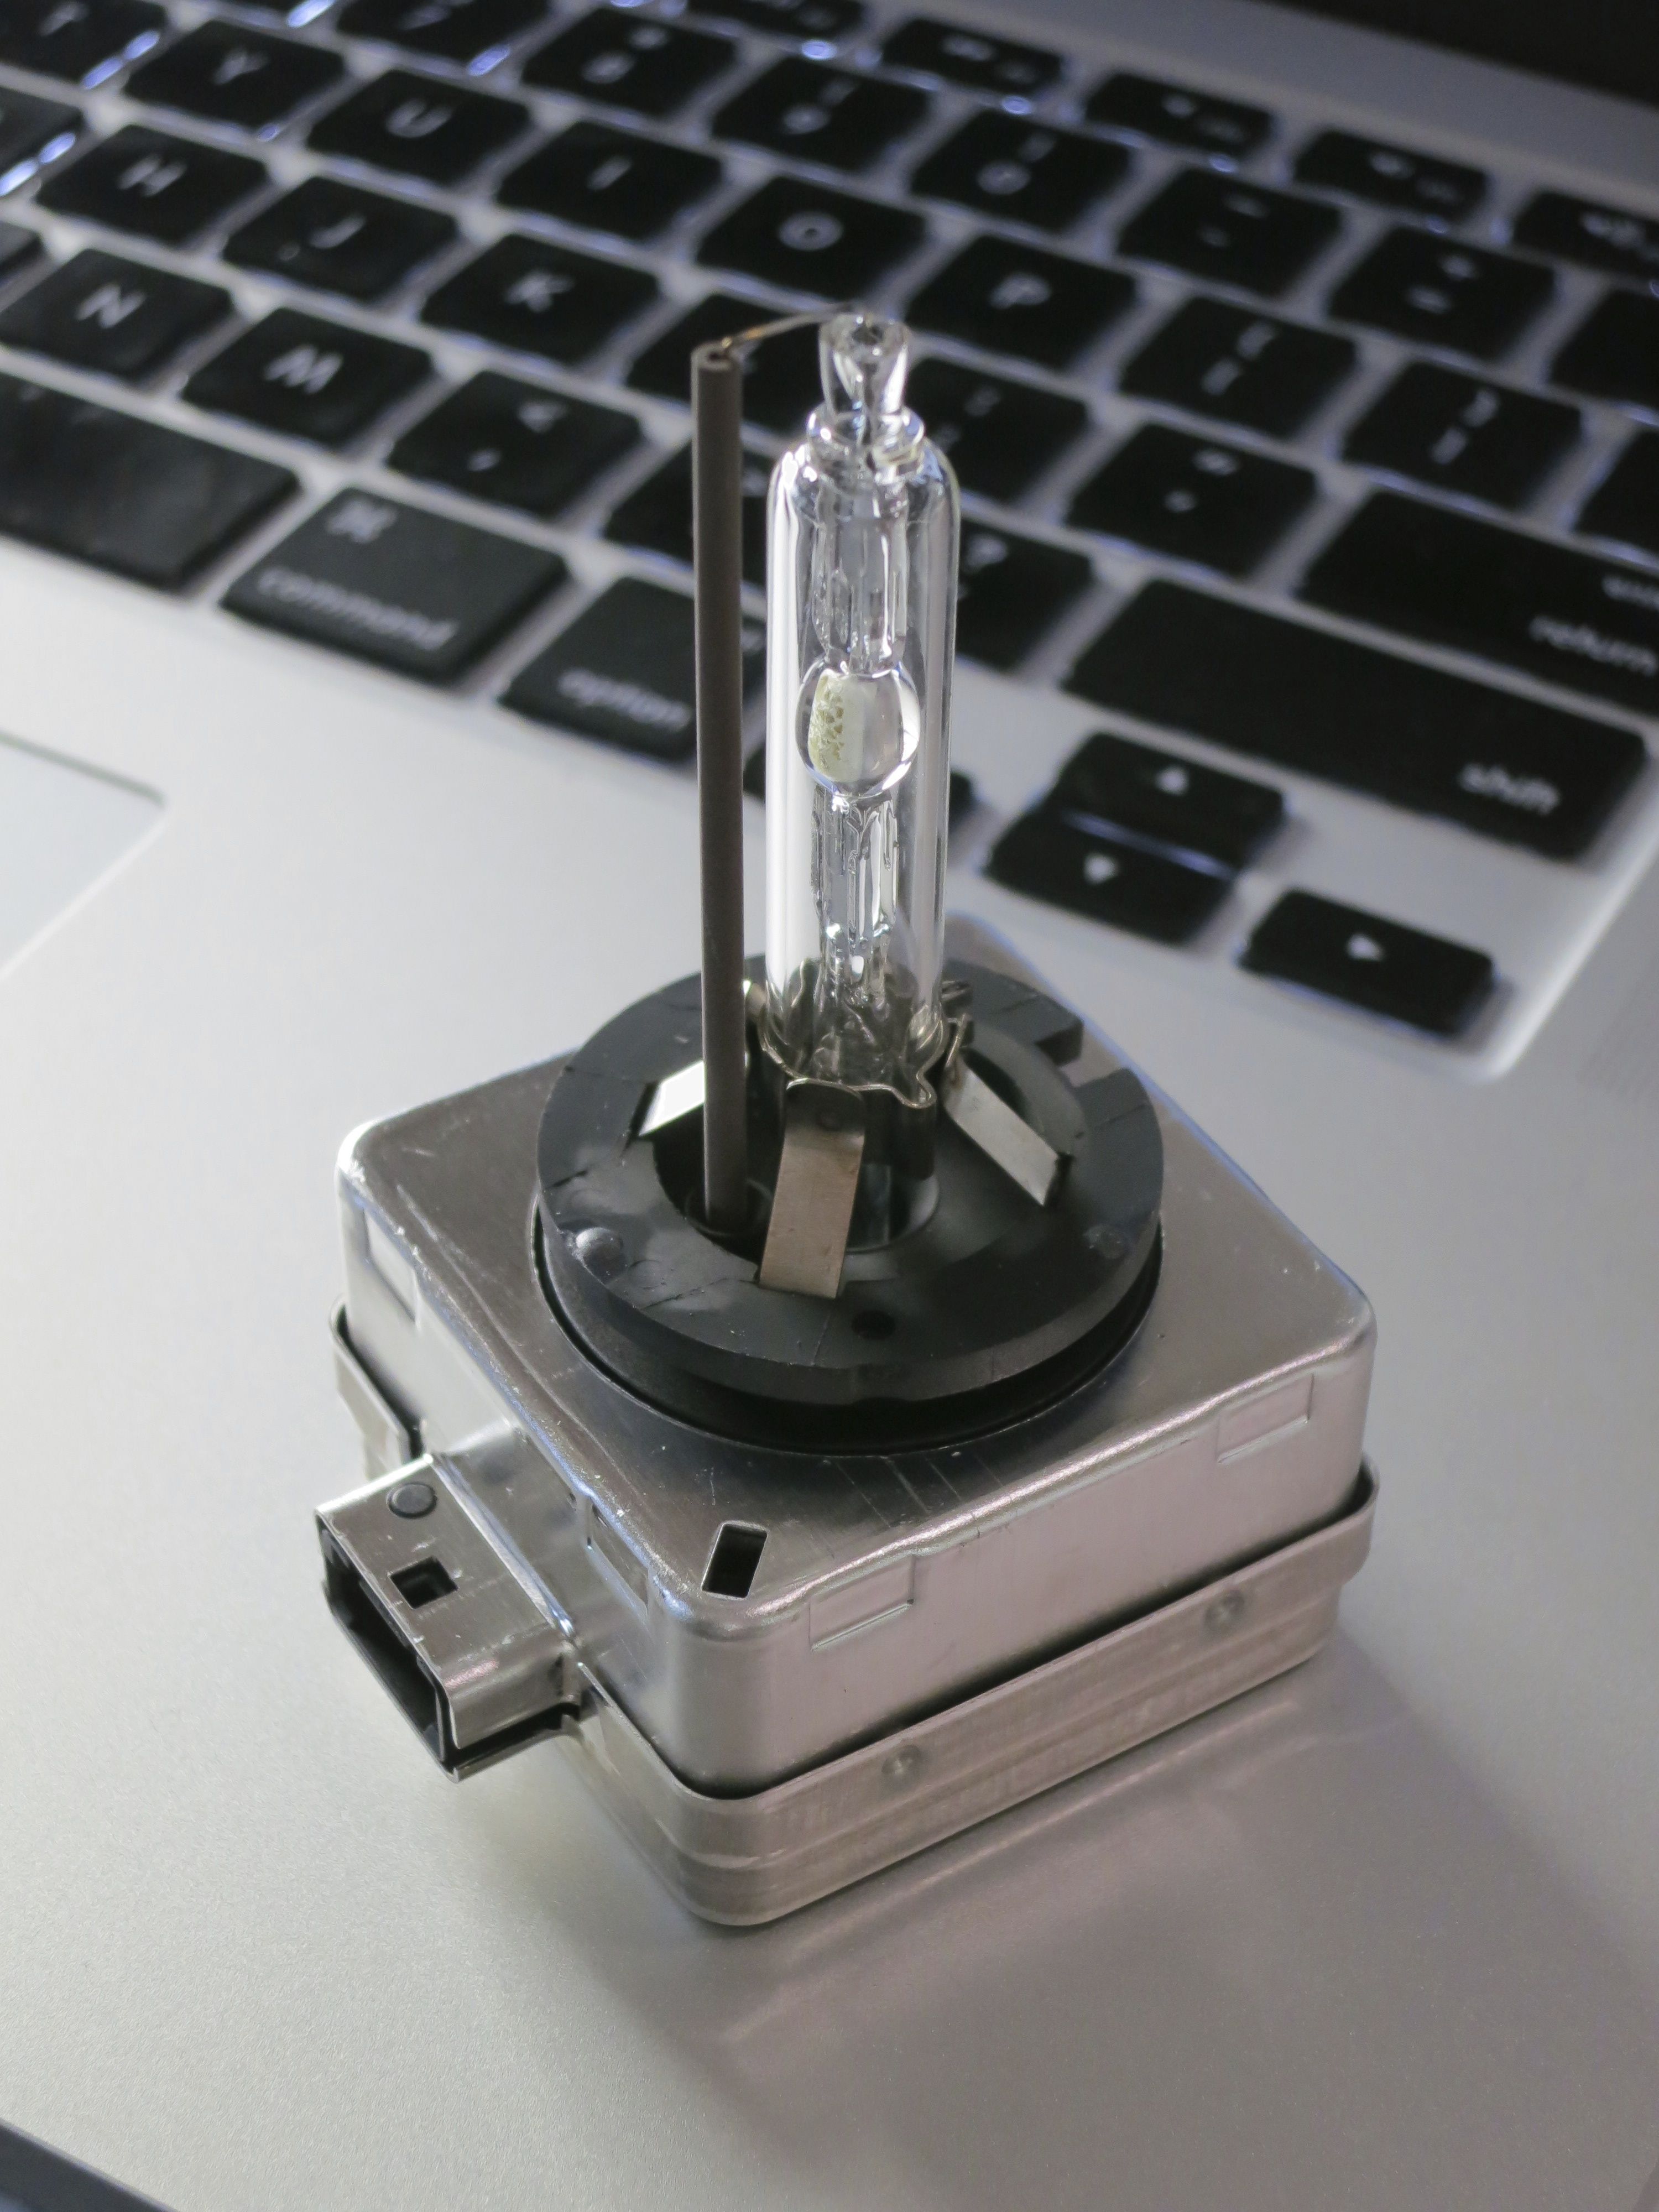
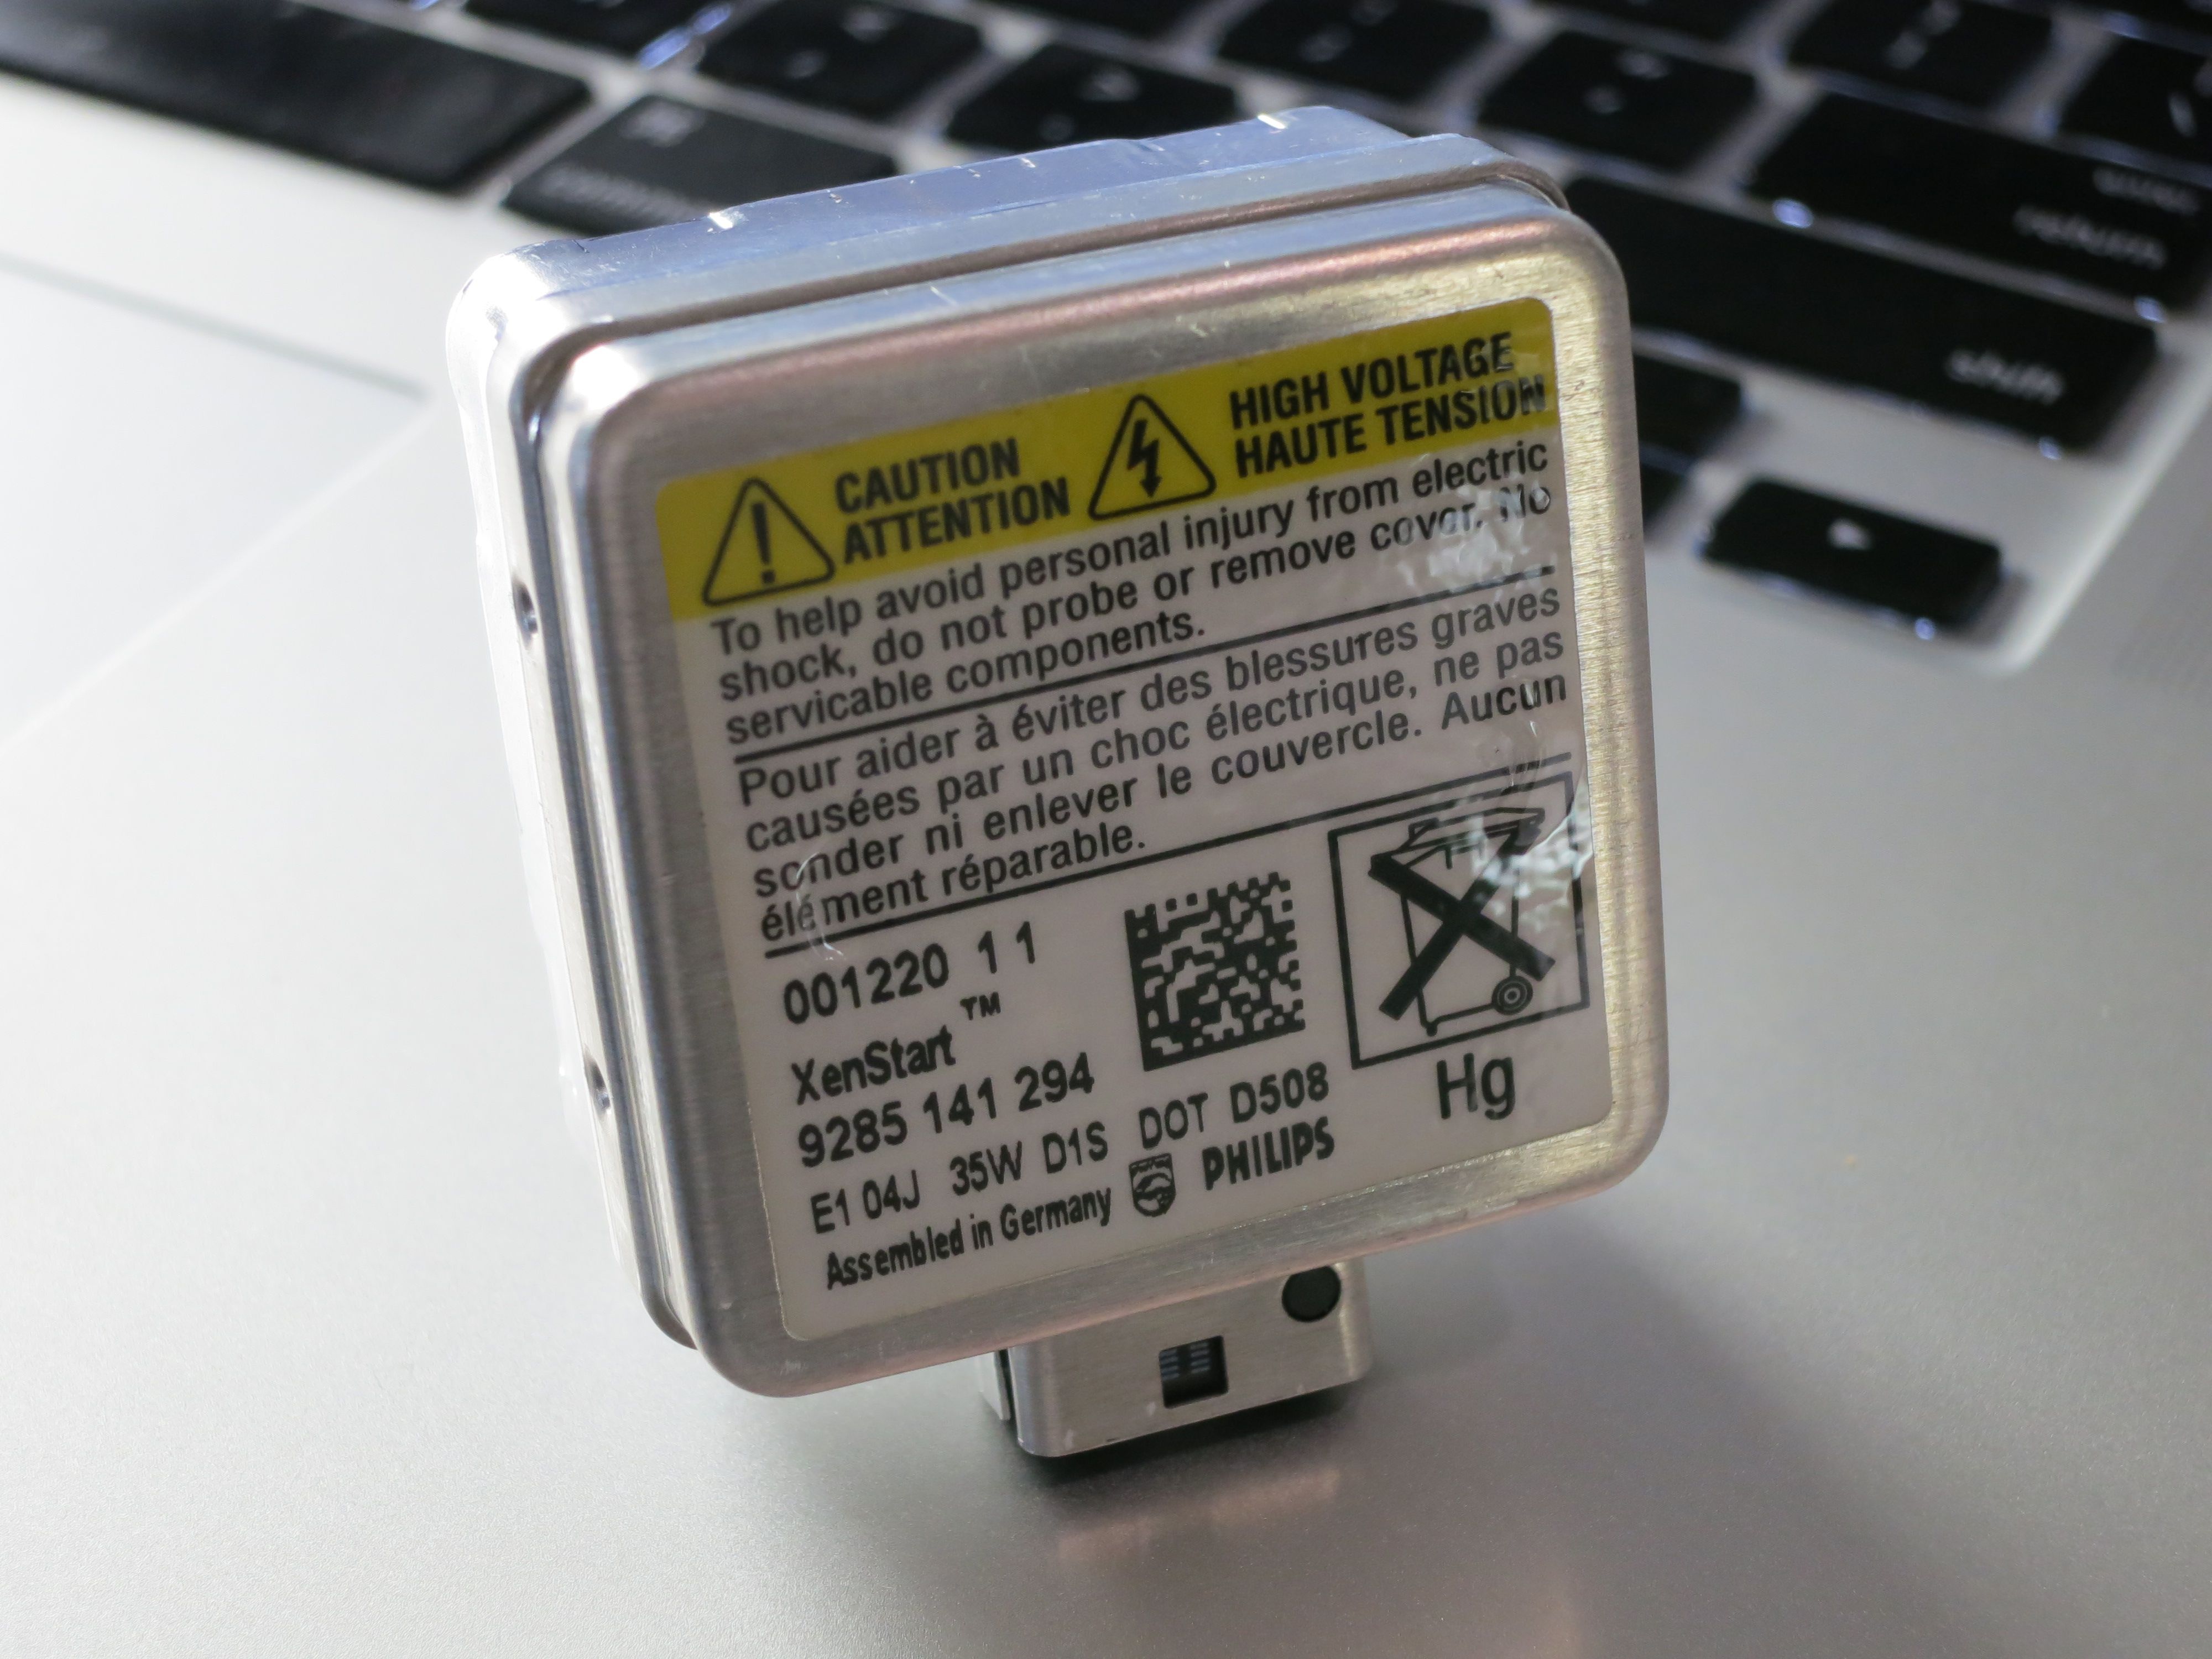
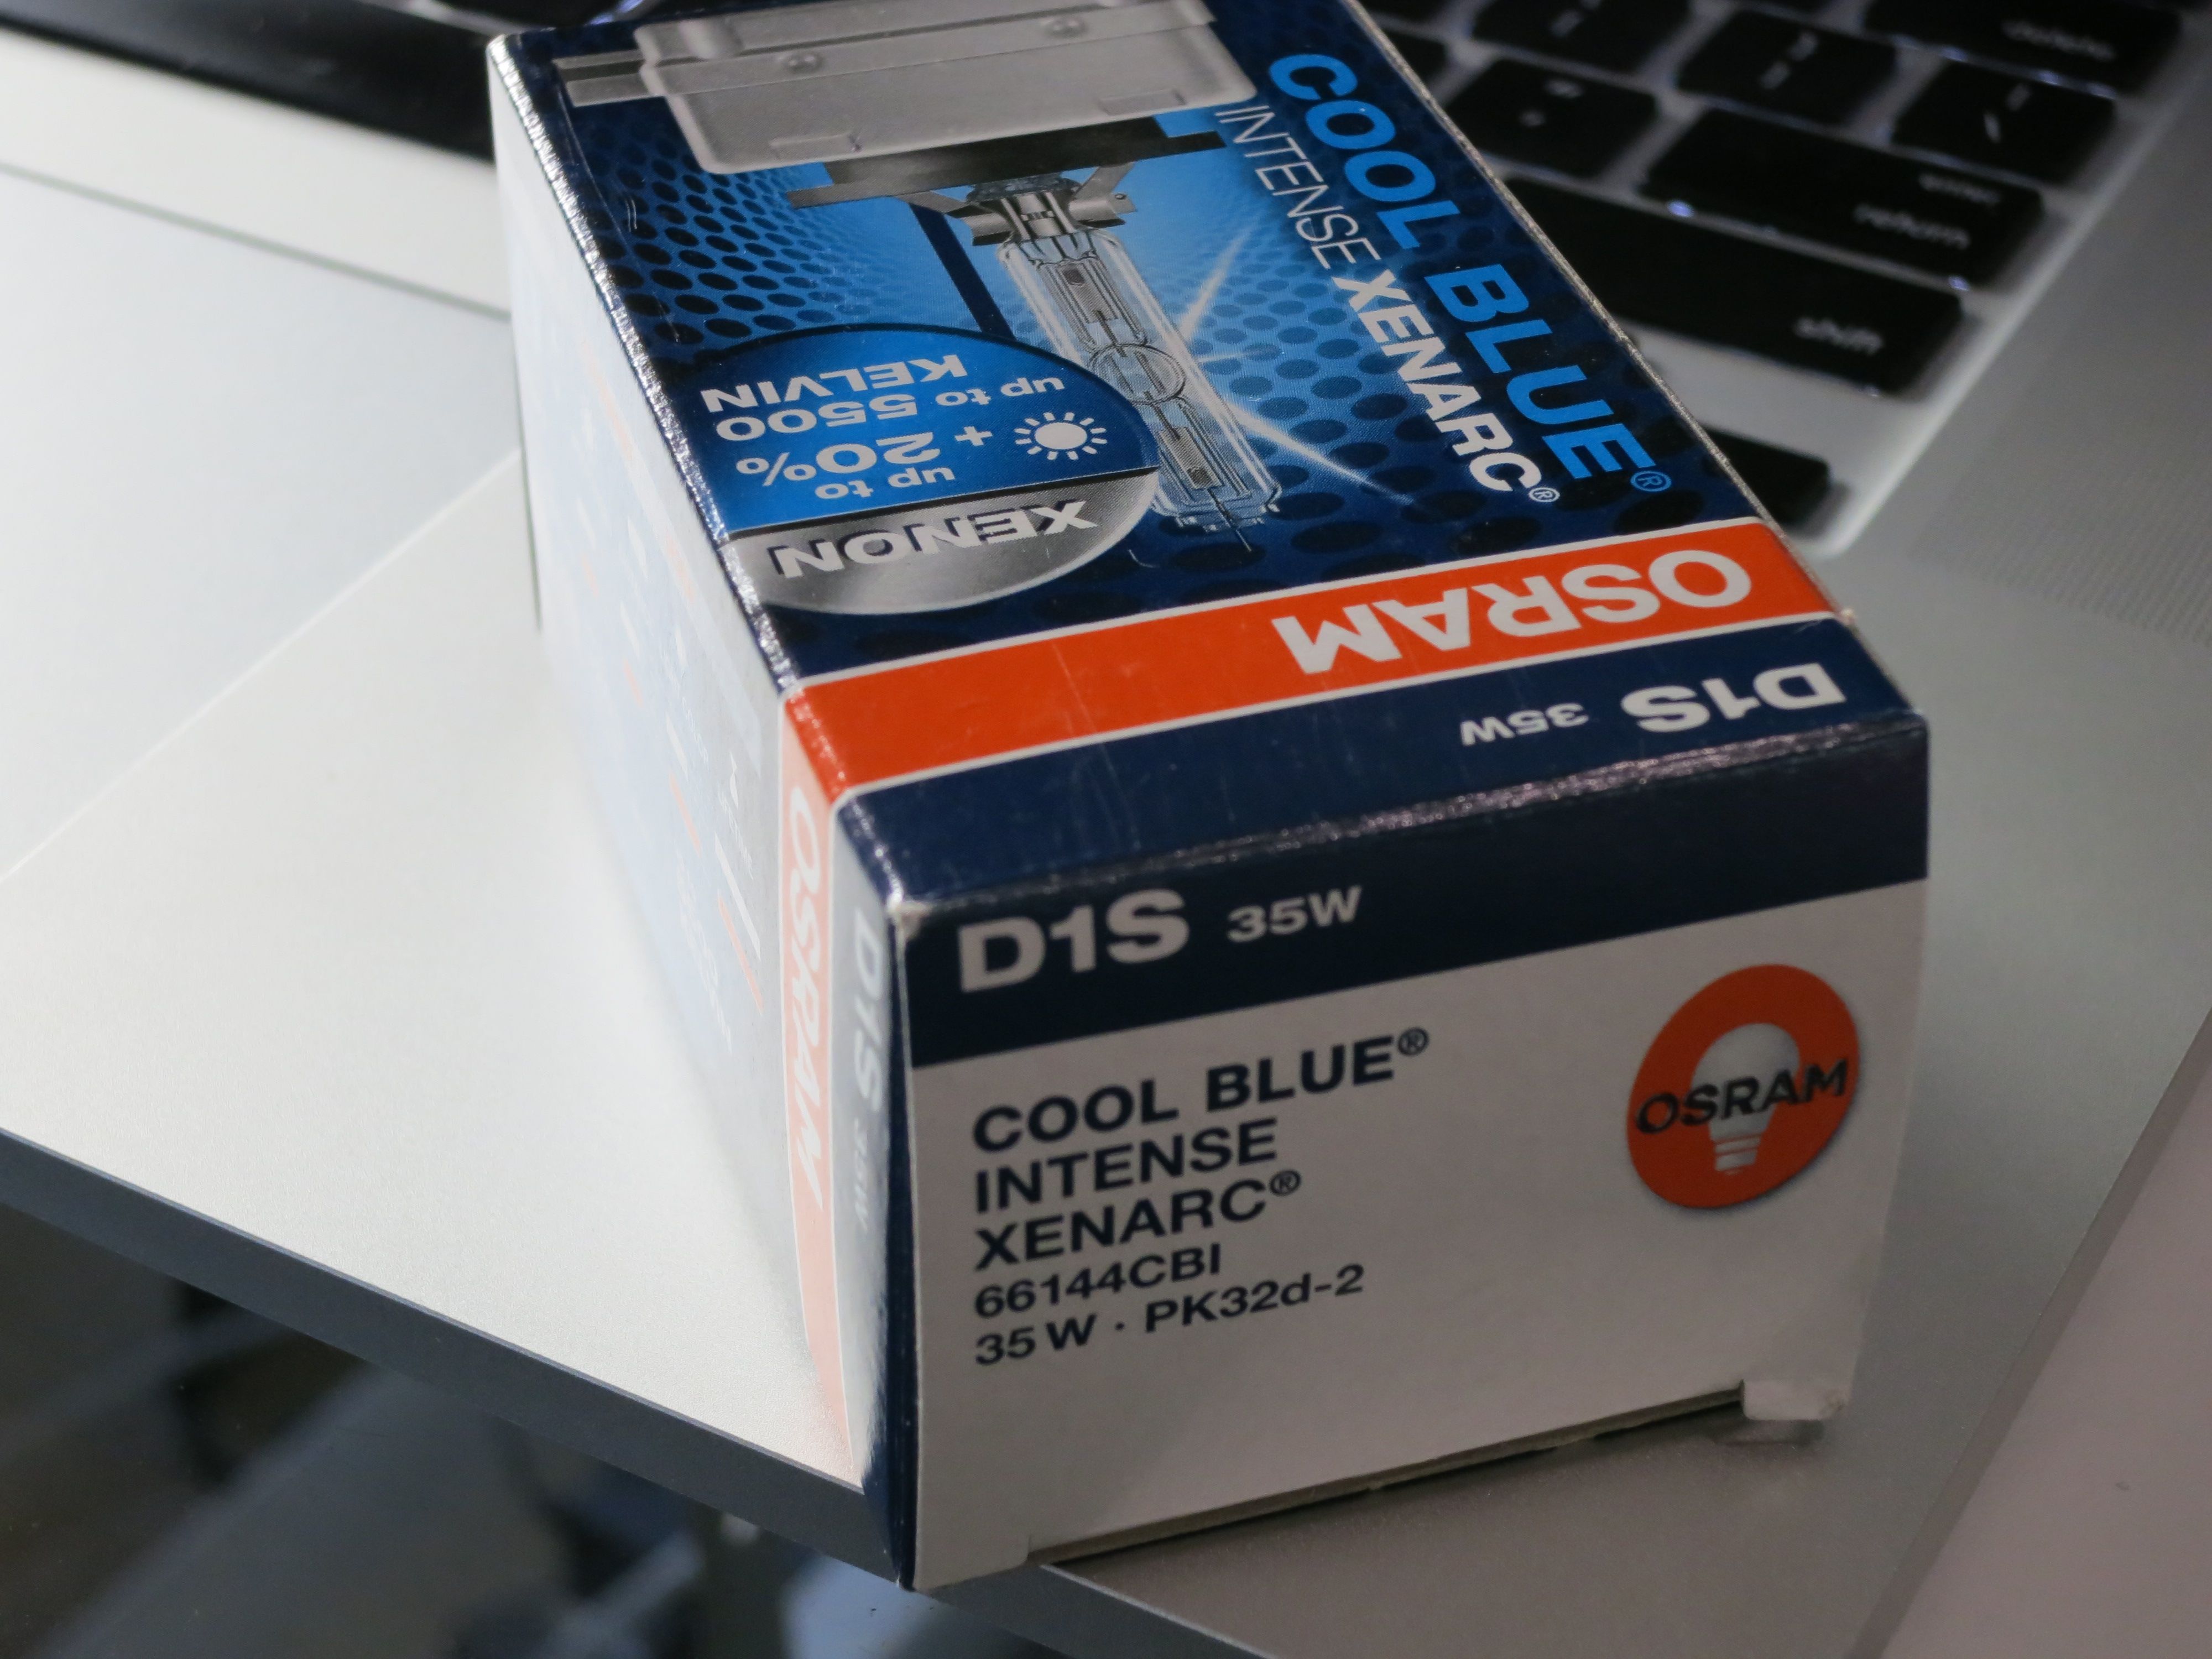
Poked around a bit and seemed like this place was “HID headlight” central, so I ordered bulbs from them. I guess OEM are 4200K, based on bulb descriptions on the site seemed like the OSRAM CBI’s were the way to go, a little cooler/blue in color, but not really blue, just a purer white and in the past I guess that made it harder to get brightness equal to the 4200Ks, but now they have that done in the OSRAM CBI 5000K. These were D1S bulbs, which have a square base that contains the igniter for the bulb. Any D1S would fit. Since I was doing the replacement myself, saving the shop labour, I got what I think are the best, and the most expensive, bulbs, $100 per. But this is less than what Audi would have charged me for a lesser 4200K bulb, I think.
Turns out the bulbs that were in the car were Phillips, here are a couple of pictures of them:
And here is the OSRAM box (bulb basically looked the same):
Seemed like a few people had success changing the bulbs without removing the bumper cover, so I tried that first, on the passenger side, taking out the airbox to access the back of the headlight. That wasn’t too hard, but what was hard was getting the wire to the bulb loosened up from some posts it was snugged between. Upside down, dark, etc., I was worried I was going to break something, and I think a new headlight assembly is $700+. So I gave up on that approach.
I had the bumper off recently to replace a grill that some jerk cracked while my car was parallel parked, and it was not too bad. Now I have had it off three times and am an “expert.” Three times being for the grill, the headlights, and to attach it properly after the headlights. There are several good how-tos out there with pictures, and I did not take any pictures, but here is the quick and dirty with some of my own tips included.
Bumper cover removal:
- Remove three fasteners connecting the bottom of the bumper to the cover that is under the engine. A stubby screwdriver (flat blade) handy for this, or a socket with a screwdriver blade, the fasteners are not a full screwdriver-length above the ground.
- Crank the front wheels to one side, then remove two torx screws fastening the outer/lower edge of the wheel liner to the wheel arch. Peel the wheel liner back, pulling it out of the metal wheel arch channel (don’t worry, pops back in easily).
- Get a light and shine it in there, find two 10mm nuts that are fastened to bolts from the bumper cover, they are a little hard to get at, one a couple of inches above the other, pretty much on the outside edge of the car. To take these off I used a deep 1/4 inch 10mm socket with a long extension and a short extension, with a swivel between the extensions. You could probably also use one or two of those springy extensions. Once loosened most of the way I could get my hands in there to grab them, spin them off the rest of the way, and pull them out.
- Repeat 2 and 3 for the other side of the car.
- Take the three T30 bolts out of the sop of the bumper cover (one in the center of the grill, other two in the bumper cover right near the grill).
- If this is the first time the bumper is coming off you might need to loosen the top of the two bumper “mounts”. There is a hole in the bumper cover to access these, they are a ways down, but a 6 inch T30 bit can reach them. CCW to loosen, one turn probably plenty, more also OK, the bolts are long. More on these mounts in a bit.
- Give a yank on the bumper cover at the back edge at each of the wheel wells. It will pop out from some plastic clips.
- Pull the bumper off from the front and set it on the ground close to the car. Put a towel down first, maybe. Or a towel over something a few inches high (I use a dog ramp). There are some connections from the car to the bumper, I never bothered disconnecting any of them, and they all are on the right side of the bumper facing the front of the car, so keep that side close to the car.
OK, now the headlights:
- Take out the top center bolt holding the headlight on/in, and loosen the bolts on the left and right (all of these are T30). The inboard screw is easy to see, a bit recessed in stuff, but very visible and around the middle of the inboard side of the headlight. The outboard bolt may be difficult. It is accessed through a hole in the sheet metal just inboard of the fender, actually two holes, one above the other. One one side I had no problem doing this with a 6 inch T30 bit. On the other side I thought I was never going to get it out. The socket portion of the bit was/is in the holes in the sheet metal, and on one side I think they did not line up perfectly with the bolt. Wiggling and pressing I finally got it. Later I bent the sheet metal a bit to try and give more wiggle room, but I don’t think that helped much. Later I also tried a 1/4 T30 bit on a long 1/4 extension, and that didn’t work. I am going to order a 8 inch T30 bit and I think that might be better.
- With the center bolt out and the other two loosened you can slide the headlight out. You can disconnect the wiring plug before you pull the headlight out, or after. There is also a clip holding some wire to the headlight you need to pry off. And the plug on the headlight unlatches if you use a screwdriver to pull back on the latching mechanism. Also, since you are unplugging the headlight, don’t bother disconnecting the battery (I have never had to put in radio code, but you do have to set the clock).
- Once the headlight is out take off the cover (two T25s, I think) and you have access to the HID bulb. Wiggle the wire to the bulb out of the prongs on the side of the bulb to give you some slack. I was not able to get the plug out with the bulb in the projector/headlight, the plug is fairly deep and the fit was pretty tight. I don’t think there is a latch anywhere. But with slack in the wire bundle (braided metal cover) you can get the bulb out, disconnect from the plug, connect the new bulb, and then put it in (no latch, but you can tell when it is seated properly). The metal clips holding the bulb in are obvious, spring loaded things.
- Put the headlights back in, and put in the center bolt, but don’t tighten any of the headlight bolts down (if you do it may be hard to get the bumper cover back on) until after you put the bumper cover back on.
Bumper cover installation:
Basically reverse the steps for removal, but pay attention to getting the cutouts in the slot of the two bumper support posts on top of the inner bumper (the big metal bumper that is there to save your hide if you wreck). The top torx bolt can be opened up to create a larger opening for the slot. The posts adjust up and down by screwing, CW to raise, so basically a reverse thread). You can’t get at these things to adjust them unless you remove the bumper or you remove the headlights. One site I looked at suggested the latter, and then supergluing the post adjustment screw so it does not move. I just futzed around taking it on and off. I also adjusted the two bolt mounts on top of the fender to close the hood/bumper gap a bit. First time I took off and replaced the bumper I am sure I missed getting the bumper cover tabs in the post slots, and I am pretty sure whoever had the bumper off before me (guys who installed the K40, and/or Audi doing serpentine belt) made the same mistake. Second bumper cover reinstall I had tightened the headlight bolts down and had to bank on the bumper to seat it, during which I cracked the plastic on at least one of the support posts (I’ll replace next time I take the bumper cover off, not worth doing before then).
New bulbs seem to be great, and I don’t think I threw their alignment off during this process. The headlights do have one white plastic piece on top that I think may be used to adjust up/down and/or left/right. When you do that I think you are supposed to hook up your VAGCOM cable and cycle the motors to get them in their neutral position. But again, at a glance my headlight alignment looks OK so I have not researched this (and manual pulled down from erWin isn’t much help). But I should check against a wall perhaps, and/or have the Audi shop take a look next time they have the car.
Next project is replacing the valve cover gaskets, which are seeping a little bit. The Audi dealership told me I needed to replace the valve covers as a precautionary measure at $700+ per. I told them to piss off, ordered gaskets, and will take this on myself. There are a couple of good DIYs on this online (ordered a couple of tools to help get at tough to get at bolts), but maybe I will document this one with some pictures.